TensorFlow Tutorial - Analysing Tweet's Sentiment with Character-Level LSTMs
This blog first started as a platform for presenting a project I worked on during the course of the winter’s 2017 Deep Learning class given by prof Aaron Courville.
Since then, I’ve been very inspired by Andrej Karpathy’s blog and decided to try to give this blog a second life by dedicating some of my free time to contribute to the community by sharing the projects I work on in a manner that, I wish, will be accessible to anyone with a very limited background in deep learning. Therefore, if this post helped you, please, DO let me know!
The Project
Since my background is in Mathematical Finance, I thought that sentiment analysis would be a great fit for this blog’s first real post considering how closely related it is to stock price prediction.
I decided to work with Tweets for two main reasons: First, there is a humongous amount of data available (Twitter even let’s you categorize tweets with those who contains happy/sad emoticons i.e. there is an almost infinite amount of training data). Second, I have a strong feeling that if a network can generalize well with Tweets where there is a great deal of spelling mistakes and ambiguous sentences, it should have no problem to generalize somewhere else.
In this tutorial, we will train a neural network to categorize a Tweet as having a positive or negative connotation, we will use the Stanford’s Sentiment140 dataset available for download here.
Given a sentence, tell whether it has a positive or negative connotation.
I will also be showing how we can merge Stanford CoreNLP library with our network to extract the “entity-wise sentiment” of a sentence.
# e.g. Sentence: Jeanne is sad, but Jean is really happy!
# Jeanne: negative
# Jean: positive
Preprocessing the data
The first thing we need to do when working with natural language is to decide the way we are going to process the text (i.e. how to embed the words), like I mentioned earlier, Tweets are flooded with spelling errors and awkward syntax, therefore, since a lot of words will not exist, a Word2Vec approach (embedding each word as a vector in $R^n$ where $n$ is smaller then the size of our vocabulary) is likely to miss out on a lot of information since it will have to completely ignore words that are not in our dictionary.
Instead, I opted for a character-level embedding, we first embed the words as a one-hot encoding of a “character-vocabulary” (which is, basically, an alphabet), in our case, we use every ASCII characters.
# e.g. the word "hi" will be a matrix where it has a 1 at
# positions (0, 7) and (1, 8) and 0's everywhere
# else considering our alphabet is given by:
emb_alphabet = 'abcdefghijklmnopqrstuvwxyz0123456789-,;' \
               '.!?:\'"/\\|_@#$%^&*~`+-=<>()[]{} '
Afterward, we feed this embedding to a CharCNN network [1], it is composed of multiple convolutional filters with different kernel widths used to capture the information of distinct character n-grams, we will get in the details of its implementation in just a second, but first, I would like to provide further motivation for this approach.
From the top of my head, there are three main advantages:
- The biggest one is probably that the model will be much smaller (around ~50-100 mb for the whole model compared to over 3GB for the classic Word2Vec from Google - this is only taking into account the embedding, not the actual model);
- The model can understand the underlying emotion of repetitive letters (e.g. hellooooo!!);
- and finally, it is almost immune to typos
Now that we have a rough idea of how we will pre-process the data, let’s get into
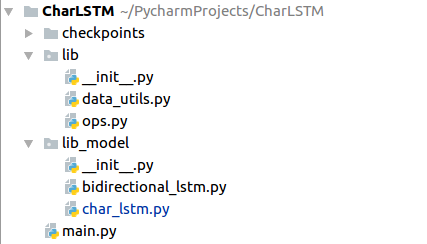
the coding; when I start a new project I like to separate my code into two main directory:
one for my model and another for basically everything else, the following code will all
fall into the data_utils.py file.
The first thing we need to do is shuffle our dataset, I won’t really get into the details of what I’m doing here, I think it is pretty straight-forward.
import random, csv

def reshape_lines(lines):
    # Hacky function to make it easier to process the data
    data = []
    for l in lines:
        #
        split = l.split('","')
        data.append((split[0][1:], split[-1][:-2]))
    return data

def save_csv(out_file, data):
    # Save a file
    with open(out_file, 'wb') as f:
        writer = csv.writer(f)
        writer.writerows(data)
    print('Data saved to file: %s' % out_file)

def shuffle_datasets(valid_perc=0.05):
    """ Shuffle the datasets """
    # TRAIN_SET and TEST_SET are respectively the path for
    # training.1600000.processed.noemoticon.csv and
    # testdata.manual.2009.06.14.csv, this function will create two
    # new files called "valid_set.csv" and "train_set.csv".

    # Make sure the paths exists, otherwise send some help messages...
    assert os.path.exists(TRAIN_SET), 'Download the training set at ' \
                                      'http://help.sentiment140.com/for-students/'
    assert os.path.exists(TEST_SET), 'Download the testing set at ' \
                                     'http://help.sentiment140.com/for-students/'

    # Create training and validation set - We take 5% of the training set
    # for the validation set by default
    print('Creating training & validation set...')

    with open(TRAIN_SET, 'r') as f:
        lines = f.readlines()
        random.shuffle(lines)
        lines_train = lines[:int(len(lines) * (1 - valid_perc))]
        lines_valid = lines[int(len(lines) * (1 - valid_perc)):]

    save_csv(PATH + 'datasets/valid_set.csv', reshape_lines(lines_valid))
    save_csv(PATH + 'datasets/train_set.csv', reshape_lines(lines_train))

    print('Creating testing set...')

    with open(TEST_SET, 'r') as f:
        lines = f.readlines()
        random.shuffle(lines)
    save_csv(PATH + 'datasets/test_set.csv', reshape_lines(lines))
    print('All datasets have been created!')

# Once this is done, we rename the new training and testing set...
TRAIN_SET = PATH + 'datasets/train_set.csv'
TEST_SET = PATH + 'datasets/test_set.csv'
VALID_SET = PATH + 'datasets/valid_set.csv'
Before going any further, shuffle_datasets() needs to be ran once. Next, we will create
our TextReader() class, this class will help us loop through the data and create minibatches
that will be fed to our network during training. It opens a CSV file (our training, validation or
test set) and reads it through a buffer by loading a small amount of lines at a time to the RAM.
# Some packages we will need:
import numpy as np
from nltk.tokenize import word_tokenize
from unidecode import unidecode
import string
import os

# Our alphabet
emb_alphabet = 'abcdefghijklmnopqrstuvwxyz0123456789-' \
               ',;.!?:\'"/\\|_@#$%^&*~`+-=<>()[]{} '

# we associate every character in our alphabet to a number:
# e.g. b => 1 d => 3 etc.
DICT = {ch: ix for ix, ch in enumerate(emb_alphabet)}

# The size of our alphabet (~70)
ALPHABET_SIZE = len(emb_alphabet)

class TextReader(object):
    """ Util for Reading the Stanford CSV Files """

    def __init__(self, file, max_word_length):
        # TextReader() takes a CSV file as input that it will read
        # through a buffer

        # we can also feed TextReader() our own sentences, therefore
        # sometimes it will not need a file
        if file != None:
            self.file = file

        # The maximum number of character in a word, default is 16 (we
        # will get to this later)
        self.max_word_length = max_word_length
Once this is done, we need to convert the sentences as a one-hot tensor of shape
[sentence_length x word_length x alphabet_size]. Basically, we encode every character
as a one-hot vector of length ALPHABET_SIZE, then we concatenate the characters together to
form words, and then concatenate words to form the sentence, thus, yielding a tensor of shape
[sentence_length x word_length x alphabet_size].
    def encode_one_hot(self, sentence):
        # Convert Sentences to np.array of Shape
        # ('sent_length', 'word_length', 'emb_size')

        max_word_length = self.max_word_length
        sent = []

        # We need to keep track of the maximum length of the sentence in a minibatch
        # so that we can pad them with zeros, this is why we return the length of every
        # sentences after they are converted to one-hot tensors
        SENT_LENGTH = 0

        # Here, we remove any non-printable characters in a sentence (mostly
        # non-ASCII characters)
        printable = string.printable
        encoded_sentence = filter(lambda x: x in printable, sentence)

        # word_tokenize() splits a sentence into an array where each element is
        # a word in the sentence, for example,
        # "My name is Charles" => ["My", "name", "is", Charles"]
        # Unidecode convert characters to utf-8
        for word in word_tokenize(unidecode(encoded_sentence)):

            # Encode one word as a matrix of shape [max_word_length x ALPHABET_SIZE]
            word_encoding = np.zeros(shape=(max_word_length, ALPHABET_SIZE))

            for i, char in enumerate(word):

                # If the character is not in the alphabet, ignore it
                try:
                    char_encoding = DICT[char]
                    one_hot = np.zeros(ALPHABET_SIZE)
                    one_hot[char_encoding] = 1
                    word_encoding[i] = one_hot

                except Exception as e:
                    pass

            sent.append(np.array(word_encoding))
            SENT_LENGTH += 1

        return np.array(sent), SENT_LENGTH
Now, we simply need to concatenate a bunch of sentences together to create a minibatch that
we will feed to the network. Note that a minibatch will have shape [batch_size x maximum_sentence_length x
maximum_word_length x alphabet_size], but at the moment the sentences all have different lengths, therefore,
we need to pad every sentences with lengths lower than maximum_sentence_length so that there are no
holes in our tensor.
    def make_minibatch(self, sentences):
        # Create a minibatch of sentences and convert sentiment
        # to a one-hot vector, also takes care of padding

        max_word_length = self.max_word_length
        minibatch_x = []
        minibatch_y = []
        max_length = 0

        for sentence in sentences:
            # Append the one-hot encoding of the sentiment to the minibatch of Y
            # 0: Negative 1: Positive
            minibatch_y.append(np.array([0, 1]) if sentence[:1] == '0' else np.array([1, 0]))

            # One-hot encoding of the sentence
            one_hot, length = self.encode_one_hot(sentence[2:-1])

            # Calculate maximum_sentence_length
            if length >= max_length:
                max_length = length

            # Append encoded sentence to the minibatch of X
            minibatch_x.append(one_hot)


        # data is a np.array of shape ('b', 's', 'w', 'e') we want to
        # pad it with np.zeros of shape ('e',) to get
        # ('b', 'SENTENCE_MAX_LENGTH', 'WORD_MAX_LENGTH', 'e')
        def numpy_fillna(data):
            """ This is a very useful function that fill the holes in our tensor """

            # Get lengths of each row of data
            lens = np.array([len(i) for i in data])

            # Mask of valid places in each row
            mask = np.arange(lens.max()) < lens[:, None]

            # Setup output array and put elements from data into masked positions
            out = np.zeros(shape=(mask.shape + (max_word_length, ALPHABET_SIZE)),
                           dtype='float32')

            out[mask] = np.concatenate(data)
            return out

        # Padding...
        minibatch_x = numpy_fillna(minibatch_x)

        return minibatch_x, np.array(minibatch_y)
Finally, we need an iterator function that loads some lines to our RAM, converts them to one-hot vectors, concatenate them to minibatches and return the minibatches, ready to be fed to the network.
    def load_to_ram(self, batch_size):
        """ Load n Rows from File f to Ram """
        # Returns True if there are still lines in the buffer,
        # otherwise returns false - the epoch is over

        self.data = []
        n_rows = batch_size
        while n_rows > 0:
            self.data.append(next(self.file))
            n_rows -= 1
        if n_rows == 0:
            return True
        else:
            return False

    def iterate_minibatch(self, batch_size, dataset=TRAIN_SET):
        """ Returns Next Batch """

        # I realize this could be more
        if dataset == TRAIN_SET:
            n_samples = 1600000 * 0.95
        elif dataset == VALID_SET:
            n_samples = 1600000 * 0.05
        elif dataset == TEST_SET:
            n_samples = 498

        # Number of batches / number of iterations per epoch
        n_batch = int(n_samples // batch_size)

        # Creates a minibatch, loads it to RAM and feed it to the network
        # until the buffer is empty
        for i in range(n_batch):
            if self.load_to_ram(batch_size):
                inputs, targets = self.make_minibatch(self.data)
                yield inputs, targets
The model
Now that we got the nitty-gritty stuff out of the way, let’s finally get into our actual model,
I sketched what we will do in the next picture. Before you move on, you should take a while
to stare at this schema until you’re comfortable with most of the concepts in there. The following
code will all be part of the char_lstm.py file unless specified otherwise.
NB: In the following picture, the TDNN block (Time-Delay Neural Network) is actually the CharCNN network, when I made this picture I kept the wording of the original paper.
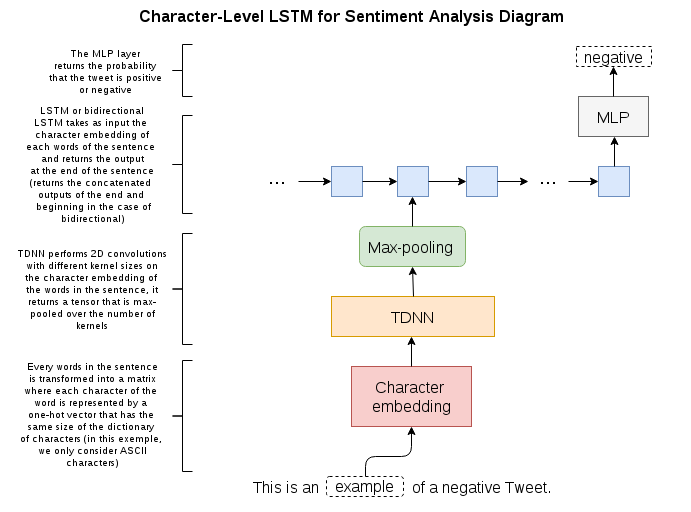
As I mentioned earlier, the first part of our model is a CharCNN network, I’ll try to give you as much information as I can on this model, but if you are interested in knowing more I highly suggest that you read this paper, also if you feel kind of lost, don’t worry, it will all get clearer when we get to the actual implementation.
The CharCNN model is composed of multiple convolutional layers with different kernel widths (in this implementation, I use 25 x kernels of size 1, 50 x kernels of size 2, …, 175 x kernels of size 7 - height is always the same as the length of our character-alphabet). Each of them take as input ONE word of the sentence at a time (the CharCNN is used as an embedding of the words that will then be fed to the LSTM where each time step in the LSTM is a word).
After the convolution, we do a max pooling operation for every kernels over the resulting width of the convolution, this operation acts as a sort of arrangement of the most important features of the word for every n-grams. For example, a kernel with a width of 4 might have learned to detect repetitive characters and would “fire” when it sees “oooo” in “helloooo!”.
We then concatenate the results of all the max pooling operation in a tensor of shape
[25 * 50 * ... * 175 x 1] (one max-pool for every kernel) for every words (the resulting
tensor for the minibatch will then be of shape [batch_size x sentence_length x 25 * 50 * ... * 175 x 1]).
# This goes in ops.py
import tensorflow as tf

def conv2d(input_, output_dim, k_h, k_w, name="conv2d"):
    """ Straight-forward convvolutional layer """
    # w is the kernel, b the bias, no strides and VALID padding

    with tf.variable_scope(name):
        w = tf.get_variable('w', [k_h, k_w, input_.get_shape()[-1], output_dim])
        b = tf.get_variable('b', [output_dim])

    return tf.nn.conv2d(input_, w, strides=[1, 1, 1, 1], padding='VALID') + b
from lib.ops import *
import tensorflow as tf

def tdnn(input_, kernels, kernel_features, scope='TDNN'):
    ''' Time Delay Neural Network
    :input:           input float tensor of shape
                      [(batch_size*num_unroll_steps) x max_word_length x embed_size]
    :kernels:         array of kernel sizes
    :kernel_features: array of kernel feature sizes (parallel to kernels)
    '''
    assert len(kernels) == len(kernel_features), 'Kernel and Features must have the same size'

    # input_ is a np.array of shape ('b', 'sentence_length', 'max_word_length', 'embed_size') we
    # need to convert it to shape ('b * sentence_length', 1, 'max_word_length', 'embed_size') to
    # use conv2D
    # It might not seem obvious why we need to use this small hack at first sight, the reason
    # is that sentence_length will change across the different minibatches, but if we kept it
    # as is sentence_length would act as the number of channels in the convnet which NEEDS to
    # stay the same
    input_ = tf.reshape(input_, [-1, self.max_word_length, ALPHABET_SIZE])
    input_ = tf.expand_dims(input_, 1)

    layers = []
    with tf.variable_scope(scope):
        for kernel_size, kernel_feature_size in zip(kernels, kernel_features):
            reduced_length = self.max_word_length - kernel_size + 1

            # [batch_size * sentence_length x max_word_length x embed_size x kernel_feature_size]
            conv = conv2d(input_, kernel_feature_size, 1,
                          kernel_size, name="kernel_%d" % kernel_size)

            # [batch_size * sentence_length x 1 x 1 x kernel_feature_size]
            pool = tf.nn.max_pool(tf.tanh(conv), [1, 1, reduced_length, 1], [1, 1, 1, 1], 'VALID')

            layers.append(tf.squeeze(pool, [1, 2]))

        if len(kernels) > 1:
            output = tf.concat(layers, 1)
        else:
            output = layers[0]

    return output
At this point, we could simply feed the tensor to the LSTM, but we can actually get better results by passing it through a “highway network” before.
Highway Network
A “highway network” is a gated multi-layer perceptron equipped with a “skip-connection”, that is, a connection to the output layer with no activation function. These kinds of network are extremely popular these days and have achieved state-of-the-art results in image classification tasks. They are especially useful in very deep neural networks because they help backpropagate the error better (the fact that there is a path with no squashing function seems to be very beneficial during the training of these networks).
# This goes in ops.py

def linear(input_, output_size, scope=None):
    """
    Linear map: output[k] = sum_i(Matrix[k, i] * args[i] ) + Bias[k]

    Args:
        args: a tensor or a list of 2D, batch x n, Tensors.
        output_size: int, second dimension of W[i].
        scope: VariableScope for the created subgraph; defaults to "Linear".

    Returns:
        A 2D Tensor with shape [batch x output_size] equal to
        sum_i(args[i] * W[i]), where W[i]s are newly created matrices.

    Raises:
        ValueError: if some of the arguments has unspecified or wrong shape.
    """

    shape = input_.get_shape().as_list()
    if len(shape) != 2:
        raise ValueError("Linear is expecting 2D arguments: %s" % str(shape))
    if not shape[1]:
        raise ValueError("Linear expects shape[1] of arguments: %s" % str(shape))
    input_size = shape[1]

    # Now the computation.
    with tf.variable_scope(scope or "SimpleLinear"):
        matrix = tf.get_variable("Matrix", [output_size, input_size],
                                 dtype=input_.dtype)
        bias_term = tf.get_variable("Bias", [output_size], dtype=input_.dtype)

    return tf.matmul(input_, tf.transpose(matrix)) + bias_term
def highway(input_, size, num_layers=1, bias=-2.0, f=tf.nn.relu, scope='Highway'):
    """Highway Network (cf. http://arxiv.org/abs/1505.00387).
    t = sigmoid(Wy + b)
    z = t * g(Wy + b) + (1 - t) * y
    where g is nonlinearity, t is transform gate, and (1 - t) is carry gate.
    """

    with tf.variable_scope(scope):
        for idx in range(num_layers):
            g = f(linear(input_, size, scope='highway_lin_%d' % idx))

            t = tf.sigmoid(linear(input_, size, scope='highway_gate_%d' % idx) + bias)

            output = t * g + (1. - t) * input_
            input_ = output

    return output
Now, let’s create our LSTM() class, the first thing we do is initialize it with placeholders
for the one-hot encoded sentences and the sentiments, those will be the input to our computational graph.
class LSTM(object):
    """ Character-Level LSTM Implementation """

    def __init__(self):
        # Get the hyperparameters
        self.hparams = self.get_hparams()

        # maximum length of each words
        max_word_length = self.hparams['max_word_length']

        # X is of shape ('b', 'sentence_length', 'max_word_length', 'alphabet_size']
        # Placeholder for the one-hot encoded sentences
        self.X = tf.placeholder('float32',
                                shape=[None, None, max_word_length, ALPHABET_SIZE],
                                name='X')

        # Placeholder for the one-hot encoded sentiment
        self.Y = tf.placeholder('float32', shape=[None, 2], name='Y')

    def get_hparams(self):
        ''' Get Hyperparameters '''

        return {
            'BATCH_SIZE':       64,
            'EPOCHS':           500,
            'max_word_length':  16,
            'learning_rate':    0.0001,
            'patience':         10000,
        }
We are now ready to build the computational graph, note that the softmax function is simply a multi-layer perceptron with a softmax activation function to output the probability that the sentence is positive or negative.
# This goes in ops.py
def softmax(input_, out_dim, scope=None):
    """ SoftMax Output """

    with tf.variable_scope(scope or 'softmax'):
        W = tf.get_variable('W', [input_.get_shape()[1], out_dim])
        b = tf.get_variable('b', [out_dim])

    return tf.nn.softmax(tf.matmul(input_, W) + b)
    def build(self,
              training=False,
              testing_batch_size=1000,
              kernels=[1, 2, 3, 4, 5, 6, 7],
              kernel_features=[25, 50, 75, 100, 125, 150, 175],
              rnn_size=650,
              dropout=0.0,
              size=700,
              train_samples=1600000 * 0.95,
              valid_samples=1600000 * 0.05):
        """
        Build the computational graph

        :param training:
            Boolean whether we are training (True) or testing (False)

        :param testing_batch_size:
            Batch size to use during testing

        :param kernels:
            Kernel width for each convolutional layer

        :param kernel_features:
            Number of kernels for each convolutional layer

        :param rnn_size:
            Size of the LSTM output

        :param dropout:
            Retain probability when using dropout

        :param size:
            Size of the Highway embeding

        :param train_samples:
            Number of training samples

        :param valid_samples:
            Number of validation samples
        """
        self.size = size
        self.hparams = self.get_hparams()
        self.max_word_length = self.hparams['max_word_length']
        self.train_samples = train_samples
        self.valid_samples = valid_samples

        # If we are training use the BATCH_SIZE from the hyperparameters
        # else use the testing batch size
        if training == True:
            BATCH_SIZE = self.hparams['BATCH_SIZE']
            self.BATCH_SIZE = BATCH_SIZE
        else:
            BATCH_SIZE = testing_batch_size
            self.BATCH_SIZE = BATCH_SIZE

        # Pass the sentences through the CharCNN network
        cnn = tdnn(self.X, kernels, kernel_features)

        # tdnn() returns a tensor of shape [batch_size * sentence_length x kernel_features]
        # highway() returns a tensor of shape [batch_size * sentence_length x size] to use
        # tensorflow dynamic_rnn module we need to reshape it to
        # [batch_size x sentence_length x size]
        cnn = highway(cnn, self.size)
        cnn = tf.reshape(cnn, [BATCH_SIZE, -1, self.size])

        # Build the LSTM
        with tf.variable_scope('LSTM'):

            # The following is pretty straight-forward, create a cell and add dropout if
            # necessary. Note that I did not use dropout to get my results, but using it
            # will probably help
            def create_rnn_cell():
                cell = rnn.BasicLSTMCell(rnn_size, state_is_tuple=True,
                                         forget_bias=0.0, reuse=False)

                if dropout > 0.0:
                    cell = tf.contrib.rnn.DropoutWrapper(cell, output_keep_prob=1. - dropout)

                return cell

            cell = create_rnn_cell()

            # Initial state of the LSTM cell
            initial_rnn_state = cell.zero_state(BATCH_SIZE, dtype='float32')

            # This function returns the outputs at every steps of
            # the LSTM (i.e. one output for every word)
            outputs, final_rnn_state = tf.nn.dynamic_rnn(cell, cnn,
                                                         initial_state=initial_rnn_state,
                                                         dtype=tf.float32)

            # In this implementation, we only care about the last outputs of the RNN
            # i.e. the output at the end of the sentence
            outputs = tf.transpose(outputs, [1, 0, 2])
            last = outputs[-1]

        self.prediction = softmax(last, 2)
Now that the computational graph has been built, we need to train it, note that the train() method
expects some arguments such as the LOGGING_PATH, SAVE_PATH, TRAIN_SET and TEST_SET, which are, respectively,
the path to the logging file, saving files, training set and testing set. In my case:
PATH = '/NOBACKUP/ashbylepoc/PycharmProjects/CharLSTM/'
TRAIN_SET = PATH + 'datasets/train_set.csv'
TEST_SET = PATH + 'datasets/test_set.csv'
VALID_SET = PATH + 'datasets/valid_set.csv'
SAVE_PATH = PATH + 'checkpoints/lstm'
LOGGING_PATH = PATH + 'checkpoints/log.txt'
from tensorflow.contrib import rnn
import numpy as np

    def train(self):
        BATCH_SIZE = self.hparams['BATCH_SIZE']
        EPOCHS = self.hparams['EPOCHS']
        max_word_length = self.hparams['max_word_length']
        learning_rate = self.hparams['learning_rate']

        # the probability for each sentiment (pos, neg)
        pred = self.prediction

        # Binary cross-entropy loss
        cost = - tf.reduce_sum(self.Y * tf.log(tf.clip_by_value(pred, 1e-10, 1.0)))

        # The number of "predictions" we got right, we assign a sentence with
        # a positive connotation when the probability to be positive is greater then
        # the probability of being negative and vice-versa.
        predictions = tf.equal(tf.argmax(pred, 1), tf.argmax(self.Y, 1))

        # Accuracy: # predictions right / total number of predictions
        acc = tf.reduce_mean(tf.cast(predictions, 'float32'))

        # We use the Adam Optimizer
        optimizer = tf.train.AdamOptimizer(learning_rate=learning_rate).minimize(cost)

        n_batch = self.train_samples // BATCH_SIZE

        # parameters for saving and early stopping
        saver = tf.train.Saver()
        patience = self.hparams['patience']

        with tf.Session() as sess:
            sess.run(tf.initialize_all_variables())
            best_acc = 0.0
            DONE = False
            epoch = 0

            while epoch <= EPOCHS and not DONE:
                loss = 0.0
                batch = 1
                epoch += 1

                with open(TRAIN_SET, 'r') as f:
                    # Load the file in a TextReader object until we've read it all
                    # then create a new TextReader Object for how many epochs we
                    # want to loop on
                    reader = TextReader(f, max_word_length)
                    for minibatch in reader.iterate_minibatch(BATCH_SIZE, dataset=TRAIN_SET):
                        batch_x, batch_y = minibatch

                        # Do backprop and compute the cost and accuracy on this minibatch
                        _, c, a = sess.run([optimizer, cost, acc],
                                           feed_dict={self.X: batch_x, self.Y: batch_y})

                        loss += c

                        if batch % 100 == 0:
                            # Compute Accuracy on the Training set and print some info
                            print('Epoch: %5d/%5d -- batch: %5d/%5d -- Loss: %.4f -- Train Accuracy: %.4f' %
                                  (epoch, EPOCHS, batch, n_batch, loss/batch, a))

                            # Write loss and accuracy to some file
                            log = open(LOGGING_PATH, 'a')
                            log.write('%s, %6d, %.5f, %.5f \n' % ('train', epoch * batch, loss/batch, a))
                            log.close()

                        # --------------
                        # EARLY STOPPING
                        # --------------

                        # Compute Accuracy on the Validation set, check if validation has improved, save model, etc
                        if batch % 500 == 0:
                            accuracy = []

                            # Validation set is very large, so accuracy is computed on testing set
                            # instead of valid set, change TEST_SET to VALID_SET to compute accuracy on valid set
                            with open(TEST_SET, 'r') as ff:
                                valid_reader = TextReader(ff, max_word_length)
                                for mb in valid_reader.iterate_minibatch(BATCH_SIZE, dataset=TEST_SET):
                                    valid_x, valid_y = mb
                                    a = sess.run([acc], feed_dict={self.X: valid_x, self.Y: valid_y})
                                    accuracy.append(a)
                                mean_acc = np.mean(accuracy)

                                # if accuracy has improved, save model and boost patience
                                if mean_acc > best_acc:
                                    best_acc = mean_acc
                                    save_path = saver.save(sess, SAVE_PATH)
                                    patience = self.hparams['patience']
                                    print('Model saved in file: %s' % save_path)

                                # else reduce patience and break loop if necessary
                                else:
                                    patience -= 500
                                    if patience <= 0:
                                        DONE = True
                                        break

                                print('Epoch: %5d/%5d -- batch: %5d/%5d -- Valid Accuracy: %.4f' %
                                     (epoch, EPOCHS, batch, n_batch, mean_acc))

                                # Write validation accuracy to log file
                                log = open(LOGGING_PATH, 'a')
                                log.write('%s, %6d, %.5f \n' % ('valid', epoch * batch, mean_acc))
                                log.close()

                        batch += 1
Finally, we want to evaluate the test set to see how well we have done, this function is
very repetitive and most of it is a copy-paste of the train() method.
    def evaluate_test_set(self):
        """
        Evaluate Test Set
        On a model that trained for around 5 epochs it achieved:
        # Valid loss: 23.50035 -- Valid Accuracy: 0.83613
        """
        BATCH_SIZE = self.hparams['BATCH_SIZE']
        max_word_length = self.hparams['max_word_length']

        pred = self.prediction

        cost = - tf.reduce_sum(self.Y * tf.log(tf.clip_by_value(pred, 1e-10, 1.0)))

        predictions = tf.equal(tf.argmax(pred, 1), tf.argmax(self.Y, 1))

        acc = tf.reduce_mean(tf.cast(predictions, 'float32'))

        # parameters for restoring variables
        saver = tf.train.Saver()

        with tf.Session() as sess:
            print('Loading model %s...' % SAVE_PATH)
            saver.restore(sess, SAVE_PATH)
            print('Done!')
            loss = []
            accuracy = []

            with open(VALID_SET, 'r') as f:
                reader = TextReader(f, max_word_length)
                for minibatch in reader.iterate_minibatch(BATCH_SIZE, dataset=VALID_SET):
                    batch_x, batch_y = minibatch

                    c, a = sess.run([cost, acc], feed_dict={self.X: batch_x, self.Y: batch_y})
                    loss.append(c)
                    accuracy.append(a)

                loss = np.mean(loss)
                accuracy = np.mean(accuracy)
                print('Valid loss: %.5f -- Valid Accuracy: %.5f' % (loss, accuracy))
                return loss, accuracy
And there we have it, your own character-level LSTM, it should train for about 5 epochs before the early-stopping criteria fires and you should achieve an accuracy on the validation set (around 80,000 samples) of 82-83% - remember that validation loss was computer on the test set, because it was much smaller, therefore, we do testing on the validation set.
Training is quite slow, therefore, I have made available a pre-trained model for those who dont want to / can’t wait, you can find it in here.
I won’t be sharing the methods for evaluating your own sentences on this blog, if you’re interested you can find them in my github repository.
For those who are interested I also created a bi-directional character-level LSTM, the code is available in my Github repo as well.
Handling Multiple Entities
The last subject I want to address is how to handle sentences with multiple entities, that is, how to capture the sentiment towards different people (here, we will focus only on “human” entities i.e. no organization, etc., but generalizing to organization is very easy to do once you understand the main concept).
To do so, we will be using the Stanford CoreNLP Toolkit, you can download the files to run the server locally here.
# Run the server with the following commands in a terminal:
$ cd stanford-corenlp-*
$ java -mx4g -cp "*" edu.stanford.nlp.pipeline.StanfordCoreNLPServer -port 9000 -timeout 15000
The API is in Java, but, fortunately, there are wrappers in almost every popular languages
we will be using pycorenlp, you can install it with a simple pip install.
The first thing we want to do here is to separate the sentences into chunks of words where each chunk is associated with it’s corresponding entity. For example, we want to convert “Jeanne is sad, but Marie is really happy!” to [“Jeanne is sad”, “Marie is really happy”].
Once this is done we can simply use our LSTM to go over each sentence and report the connotation.
At the same time we will also want to fix “coreferences”, take the following sentence for example: “Marie came home yesterday, she was really sad.”, after the chunking we would get something like: [“Marie came home yesterday”, “she was really sad”] what we would really want is [“Marie came home yesterday”, “Marie was really sad”]. Otherwise we would not be able to assign a sentiment to any entity for the second sentence, this process is known as anaphora resolution.
Stanford CoreNLP tutorial starts here…
The following code is all part of the parse_doc.py file, this file should
be outside the directories and act as your main file. Now, let’s create a StanfordCoreNLP object that will be used to make
API calls, make sure you started the server before you import pycorenlp.
from pycorenlp import StanfordCoreNLP
from nltk.tokenize import sent_tokenize
from nltk import Tree
from lib_model.char_lstm import *

# StanfordCoreNLP object used for making API calls
nlp = StanfordCoreNLP('http://localhost:9000')
I will not be going over how the Stanford CoreNLP algorithms work, but if you are interested you can read more about it here, I will only say that, to my knowledge, this is the best parser available online.
Let’s create a method that resolve coreferences, it will take a sentence as input and return a new sentence with the pronouns transformed to their corresponding entity.
def get_rep_mention(coreference):
    """
    This function will make more sense if you go through the
    coreference_resolution() method first.
    """

    for reference in coreference:
        if reference['isRepresentativeMention'] == True:
            pos = (reference['startIndex'], reference['headIndex'])
            text = reference['text']
            return text, pos

def coreference_resolution(sentence):
    """ Coreference/Anaphora Resolution"""

    # This is where Stanford CoreNLP does its magic: it takes a sentence
    # and returns a dictionary where the keys are the named entity and
    # the values are dictionaries with every coreferences (usually pronouns)
    # associated with the entity - I highly suggest that you take a
    # close look at the output of the API calls before you move on
    output = nlp.annotate(sentence, properties={'annotators':   'coref',
                                                'outputFormat': 'json'})
    tokens = word_tokenize(sentence)
    coreferences = output['corefs']
    entity_keys = coreferences.keys()

    for k in entity_keys:
        # skip non PERSON NP; is NP is a person it gender will either be
        # MALE or FEMALE
        if coreferences[k][0]['gender'] == 'MALE' or coreferences[k][0]['gender'] == 'FEMALE':

            # if isRepresentativeMention is True then the word is a
            # proper noun - we want those
            rep_mention, pos = get_rep_mention(coreferences[k])

            # coreferences is a list with all the pronouns that
            # needs to be replaced by the rep_mention
            for reference in coreferences[k]:

                # Don't remplace the noun with itself...
                if not reference['isRepresentativeMention']:

                    # 'startIndex' and 'headIndex' are respectively
                    # the starting and ending position token-wise of
                    # the noun/pronoun, note that tokens are words, therefore,
                    # if reference['startIndex'] = 3 it actually means that
                    # we're looking for the 4th word in the sentence
                    start, end = reference['startIndex'] - 1, reference['headIndex'] - 1

                    # if 'startIndex' == 'headIndex' which should almost always
                    # be the case, then there is only one word to replace
                    if start == end:
                        tokens[start] = rep_mention
                    else:
                        # Otherwise we need to replace multiple words
                        # and delete the words we are not going to be
                        # using anymore
                        tokens[start] = rep_mention
                        del tokens[start + 1: end]

    # Join the words together with spaces to return the
    # sentence
    sentence = ' '.join(tokens)
    return sentence.encode('utf-8')
Next, we want to take this new sentence and divide it into chunks where each chunk of words is associated with its corresponding entity. We will do this with the “parse” annotator, in the following picture you can see a tree visualization of what it did for the sentence “Jeanne is mad, but Marie is happy!”.
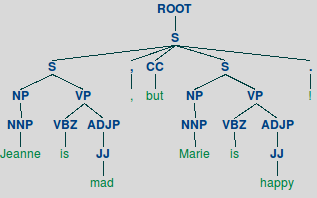
You can reproduce this tree with the following code:
import nltk

def parse_sentence(sentence):
    """ sentence --> named-entity chunked tree """
    output = nlp.annotate(sentence, properties={'annotators':   'tokenize, ssplit, pos,'
                                                                ' lemma, ner, parse',
                                                'outputFormat': 'json'})
    # print_tree(output)
    return Tree.fromstring(output['sentences'][0]['parse'])

def draw_tree(tree):
    """ Draw a tree """
    pattern = "NP: {<DT>?<JJ>*<NN>}"
    NPChunker = nltk.RegexpParser(pattern)
    result = NPChunker.parse(tree)
    result.draw()

draw_tree(parse_sentence("Jeanne is mad, but Marie is happy!"))
As you can see, the only thing left to do is to grab the noun and associate it to all the leaves of his subtree, to do this we will traverse the tree using breadth-first search.
import Queue

def tree_to_str(tree):
    """ Convert a tree/subtree to a string """
    return ' '.join([w for w in tree.leaves()])

def get_subtrees(tree):
    """ Return chunked sentences """

    subtrees = []

    # FIFO queue used to store the child
    # elements of the tree during traversal
    queue = Queue.Queue()

    # First element is the root node
    queue.put(tree)

    while not queue.empty():
        node = queue.get()

        # Put all the childs of a node in the Queue
        # to process them later
        for child in node:
            if isinstance(child, Tree):
                queue.put(child)

        # nouns are always childs of an "S" node
        if node.label() == "S":
            # if childs are (respectively) 'NP' and 'VP'
            # convert subtree to string, else keep looking

            # Get the labels for all the childs
            child_labels = [child.label() for child in node]

            if "NP" in child_labels and "VP" in child_labels:

                # Convert the subtree to string and look for the
                # noun
                sentence = tree_to_str(node)
                for child in node:
                    if child.label() == "NP":
                        # look for NNP - keep only the names
                        subchild_labels = [subchild.label() for subchild in child]
                        if "NNP" in subchild_labels:
                            noun = ""
                            for subchild in child:
                                if subchild.label() == "NNP":
                                    noun = ' '.join([noun, subchild.leaves()[0]])

                            # Append the noun with it's associated
                            # sentence
                            subtrees.append((noun, sentence))
    return subtrees
Finally, we could put all of this together, call the neural network and predict the connotation, but we will go one step further, at the moment, our code is only suited for handling single sentences, let’s make it compatible with documents of any length.
Note that the predict_sentences() and categorize_document() methods used below
are available in my Github repo.
def flatten(list):
    """ Flatten a list of lists
    i.e. [[element], [more element]] => [element, more element]
    """
    return [val for sublist in list for val in sublist]

def parse_doc(document):
    """ Extract relevant entities in a document """

    # sent_tokenize() returns an array where each element
    # is a sentence
    sentences = sent_tokenize(document)

    # Context of all named entities
    ne_context = []

    for sentence in sentences:
        # change pronouns to their respective nouns
        print('Anaphora resolution for sentence: %s' % sentence)
        tree = parse_sentence(coreference_resolution(sentence))
        print('Done!')

        # get context for each noun
        print('Named Entity Clustering:')

        # context is a tuple with the noun and
        # the sentence associated to the noun
        context = get_subtrees(tree)

        for n, s in context:
            print('%s' % s)

        # We return the context for every entity in
        # the document
        ne_context.append(context)

    return flatten(ne_context)

def init_dict(contexts):
    """ Initialize a dictionary with all the entities in the contexts """
    dict = {}
    for k, _ in contexts:
        if not k in dict:
            dict[k] = None
    return dict

def get_sentiment(document, network):
    """ Create a dict of every entities with their associated sentiment """

    print('Parsing Document...')
    contexts = parse_doc(document)
    print('Done!')

    entities = init_dict(contexts)

    # Encode the sentences as utf-8
    sentences = [sentence.encode('utf-8') for _, sentence in contexts]

    # Use the neural network to predict the connotations for
    # every sentences, note that if you plan on analyzing multiple
    # sentences (> BATCH_SIZE ~ 64) you should use the categorize_document()
    # method available in my github repo https://github.com/charlesashby/CharLSTM
    predictions = network.predict_sentences(sentences)

    # When an entity appears multiple times in a document we
    # take the mean sentiment as our prediction, note that the
    # prediction is a floating point in [-1, 1] it is defined as
    # mean(pred(pos) - pred(neg))
    for i, c in enumerate(contexts):
        key = c[0]
        if entities[key] != None:
            entities[key] += (predictions[0][i][0] - predictions[0][i][1])
            entities[key] /= 2
        else:
            entities[key] = (predictions[0][i][0] - predictions[0][i][1])

    # Print the sentiment
    for e in entities.keys():
        print('Entity: %s -- sentiment: %s' % (e, entities[e]))
And that is it! Here are the results you can expect with the pretrained unidirectional LSTM model:
# Results for sentence: Jean is really sad, but Adam is the happiest guy ever
# Entity:  Jean -- sentiment: -0.197092 (neg)
# Entity:  Adam -- sentiment: 0.885632  (pos)
Got Questions?
Hit me up in the comment section below and I will do my best to answer.
Also, if you like this kind of tutorial,I’ll be releasing a new tutorial on reinforcement learning in the upcoming weeks, like always, I’ll be covering slightly advanced subjects, but in a manner that should be understandable by everybody.
With all that being said, thanks so much for reading this post. I will catch you in the next tutorial!
- Charles Ashby